Title here
Summary here
In this module, we will learn about the key components of an API (Application Programming Interface) and how they function together to enable communication between different software systems. By breaking down the core elements that make up an API, you’ll better understand how APIs facilitate seamless interaction between applications. This knowledge is fundamental to effectively using or developing APIs.
First, you will start with the Top-Bottom approach:
Break away those tiny chunks, aka components, from a typical API sample and explain each of these components. Then, put them back together again to form the API.
Sounds fun, right?
Let’s Roll:
If you’ve been following the course in logical order (which we hope you have), then you’ll already be familiar with the JSON format. As always, you still use our Sample Petstore API, just like in the previous examples.
Sample Petstore API
  1    {
  2      "openapi": "3.0.0",
  3      "info": {
  4        "title": "Petstore API",
  5        "description": "This is a sample server for a pet store.",
  6        "version": "1.0.0"
  7      },
  8      "servers": [
  9        {
 10          "url": "https://api.petstore.example.com/v1",
 11          "description": "Production server"
 12        }
 13      ],
 14      "components": {
 15        "securitySchemes": {
 16          "ApiKeyAuth": {
 17            "type": "apiKey",
 18            "in": "header",
 19            "name": "X-API-Key"
 20          }
 21        },
 22        "schemas": {
 23          "Pet": {
 24            "type": "object",
 25            "required": ["id", "name"],
 26            "properties": {
 27              "id": {
 28                "type": "integer",
 29                "format": "int64"
 30              },
 31              "name": {
 32                "type": "string"
 33              },
 34              "tag": {
 35                "type": "string"
 36              }
 37            }
 38          },
 39          "Error": {
 40            "type": "object",
 41            "required": ["code", "message"],
 42            "properties": {
 43              "code": {
 44                "type": "integer",
 45                "format": "int32"
 46              },
 47              "message": {
 48                "type": "string"
 49              }
 50            }
 51          }
 52        }
 53      },
 54      "security": [
 55        {
 56          "ApiKeyAuth": []
 57        }
 58      ],
 59      "paths": {
 60        "/pets": {
 61          "get": {
 62            "summary": "List all pets",
 63            "operationId": "listPets",
 64            "tags": ["pets"],
 65            "parameters": [
 66              {
 67                "name": "limit",
 68                "in": "query",
 69                "description": "How many items to return at one time (max 100)",
 70                "required": false,
 71                "schema": {
 72                  "type": "integer",
 73                  "format": "int32"
 74                }
 75              }
 76            ],
 77            "responses": {
 78              "200": {
 79                "description": "A paged array of pets",
 80                "content": {
 81                  "application/json": {
 82                    "schema": {
 83                      "type": "array",
 84                      "items": {
 85                        "$ref": "#/components/schemas/Pet"
 86                      }
 87                    }
 88                  }
 89                }
 90              },
 91              "default": {
 92                "description": "unexpected error",
 93                "content": {
 94                  "application/json": {
 95                    "schema": {
 96                      "$ref": "#/components/schemas/Error"
 97                    }
 98                  }
 99                }
100              }
101            }
102          }
103        },
104        "/pets/{petId}": {
105          "get": {
106            "summary": "Info for a specific pet",
107            "operationId": "showPetById",
108            "tags": ["pets"],
109            "parameters": [
110              {
111                "name": "petId",
112                "in": "path",
113                "required": true,
114                "description": "The id of the pet to retrieve",
115                "schema": {
116                  "type": "integer",
117                  "format": "int64"
118                }
119              }
120            ],
121            "responses": {
122              "200": {
123                "description": "Expected response to a valid request",
124                "content": {
125                  "application/json": {
126                    "schema": {
127                      "$ref": "#/components/schemas/Pet"
128                    }
129                  }
130                }
131              },
132              "default": {
133                "description": "unexpected error",
134                "content": {
135                  "application/json": {
136                    "schema": {
137                      "$ref": "#/components/schemas/Error"
138                    }
139                  }
140                }
141              }
142            }
143          }
144        }
145      },
146      "headers": {
147        "Accept": {
148          "description": "Media type that is acceptable for the response",
149          "schema": {
150            "type": "string"
151          },
152          "example": "application/json"
153        },
154        "Content-Type": {
155          "description": "The MIME type of the body of the request",
156          "schema": {
157            "type": "string"
158          },
159          "example": "application/json"
160        }
161      }
162    }
163
That’s a lot to take in; to be honest, the whole JSON format and all the tags make it look even more intimidating.
However, this is what a typical API sample would look like. To document an API, you MUST understand its components**.**
Since you are using the top-down approach that I mentioned, you will start from the largest component to the smallest based on their SCOPE AND PURPOSE NOT SIZE
The Components of an API:
In order not to jump the boat by first explaining what a Base URL is, you need to understand why APIs have URLs and how they are structured.
We won’t go into full details on API URL structure, but you will get a glimpse of how it works.
When you type in a URL, you are sending a request to the server bearing that address and a response will be sent back to you. The same happens with API URLs, but in this case, we are sending a request to the server to get an API response.
An API URL has three parts:
Base URL: This is the initial part of the API URL that is used across all the API servers.
The endpoint: The endpoint is the resource you want to access when you send the request (what you/the end-user is requesting)
Query parameter: This is the last part of the URL, it contains a certain query to get specific information from the endpoint or resource you want to access. You can identify a query parameter with the initial question mark ?
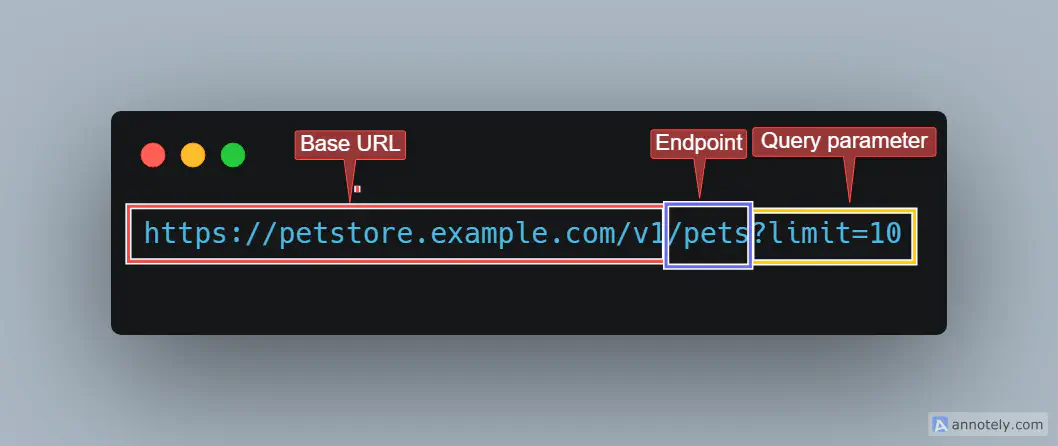
This image shows the Base URL of our Sample Petstore API
For security reasons, not everyone is allowed to access certain areas in an API especially ones that contain sensitive information. API Data is protected by adding an Authentication Layer which is normally called Auth. This Authentication Layer then verifies that the person trying to make a request has permission using Authorization.
Authentication and Authorization work hand in hand to ensure API security but play unique roles. Let’s say you want to make an API request to get data on dogs available in our Petstore:
First, our Petstore API is protected since it contains sensitive information. You have to ask for the password access, that is Authentication. The authentication process here can be as simple as issuing you a unique username and password or using third-party tokens like Oauth, JWT etc.
Once you have gotten the password nothing happens except you key in the password into the system. Now Authorization steps in here to make sure that whatever credentials you have presented are approved.
When that is done, you are in.
OAuth: OAuth involves using a third-party provider to grant access so that you don’t have to share your credentials with the API provider. An example is using your Google account to sign up for different platforms. This is a typical example of an OAuth authentication and how it works.
JWT Bearer: This uses JSON Web Tokens (JWTs), where the server issues a signed JWT to the client, and the client includes this token in the Authorization header of requests; the server then verifies the token’s signature to ensure its validity and authenticity.
API key: An API key is a unique identifier issued by the API providers themselves. When making a request to a server that uses an API key, you have to include the API key as a parameter in the request body.
Basic Oauth: This is a simple authentication method that allows you to send HTTP requests by providing a username and password in plain text.
API Authentication in our Sample Petstore API
 1      "components": {
 2        "securitySchemes": {
 3          "ApiKeyAuth": {
 4            "type": "apiKey",
 5            "in": "header",
 6            "name": "X-API-Key"
 7          }
 8        },
 9    .
10    .
11    .
12    .
13    "security": [
14        {
15          "ApiKeyAuth": []
16        }
17      ],
Let’s understand the situation going on above. This is a snippet of how Authorization is used in an API document.
In the component **securitySchemes**, the type of authentication is defined as **apiKey**. This means that the API requires an API key for security.
Here’s a breakdown:
**type: "apiKey"**: Specifies that the API uses an API key for authentication.
**in: "header"**: Indicates that the API key should be included in the request header.
**name: "X-API-Key"**: The name of the header where the API key should be provided.
In the **security** section, the **ApiKeyAuth** scheme is applied to the entire API or specific endpoints
An API Endpoint is a URL. We have seen this in the diagram showing the parts of an API URL. So the question is, what does an endpoint do? Well, we can say that it is the last destination of the API client on route to meet the API server.
An API endpoint is the location where the request by the API client is sent to retrieve the resource from the server. An application can have multiple endpoints. Each of these endpoints retrieves a specific resource. Since API endpoints lead to the specific location of the resource, we use them to test the API response.
API Endpoints in our Sample Petstore API
1    /pets
2
3 /pets/{petId}HTTP methods refer to the kind of actions a Client wants to take on a resource. These actions can involve retrieving, deleting, or updating certain information.
There are 5 HTTP Methods:
The GET method is used to request data from a specified resource. From our Sample Petstore API, you can use the GET method to retrieve a list of pets or get details about a specific pet.
Endpoint: /pets
Description: Fetches a list of all pets in the store. You can optionally limit the number of pets returned using a query parameter.
Example Request:
1    GET https://api.petstore.example.com/v1/pets?limit=10
2    X-API-Key: your-api-key-here
3    Accept: application/json
Example Response:’
 1    [
 2      {
 3        "id": 1,
 4        "name": "Doggo",
 5        "tag": "dog"
 6      },
 7      {
 8        "id": 2,
 9        "name": "Kitty",
10        "tag": "cat"
11      }
12 ]The POST method is used to create a new resource in the specified resource collection. In the context of the Sample Petstore API, you can use the POST method to add a new pet to the store.
Endpoint: /pets
Description: Adds a new pet to the store.
Example Request:
1    POST https://api.petstore.example.com/v1/pets
2    X-API-Key: your-api-key-here
3    Content-Type: application/json
4
5    {
6      "id": 3,
7      "name": "Bunny",
8      "tag": "rabbit"
9    }
Example Response:
1
2    {
3      "id": 3,
4      "name": "Bunny",
5      "tag": "rabbit"
6 }The PUT method is used to update an existing resource or create a new resource if it does not already exist.
Endpoint: /pets/{petId}
Description: Updates the details of an existing pet by its ID.
Example Request:
1    PUT https://api.petstore.example.com/v1/pets/1
2    X-API-Key: your-api-key-here
3    Content-Type: application/json
4
5    {
6      "id": 1,
7      "name": "Doggo Updated",
8      "tag": "dog"
9    }
Example Response:
1    {
2      "id": 1,
3      "name": "Doggo Updated",
4 "tag": "dog"The DELETE method is used to remove a resource from the server. From our Sample Petstore API, you can use the DELETE method to remove a specific pet from the store.
Endpoint: /pets/{petId}
Description: Deletes a pet from the store by its ID.
Example Request:
1    DELETE https://api.petstore.example.com/v1/pets/1
2    X-API-Key: your-api-key-here
Example Response:
1 HTTP/1.1 204 No ContentThe request body contains the data to be sent to the API. It has to be in a specified format such as JSON, YAML, XML, etc. The request body is usually specified under the /path
We have covered API data formats in the previous module.
Example of a Request Body from our Sample Petstore API
Since we are using a GET method, the response body is not clearly defined. However, if we are using a POST request, the response body will be given as:
 1    {
 2      "requestBody": {
 3        "description": "Pet object that needs to be added",
 4        "required": true,
 5        "content": {
 6          "application/json": {
 7            "schema": {
 8              "$ref": "#/components/schemas/Pet"
 9            }
10          }
11        }
12      }
13 }Response is the data returned by the API after processing a request. The Response is made up of three parts: The Response Header, the Response body and Status code. We will cover each of them individually.
RESPONSE BODY: The Response body is the actual content returned after we send our request.
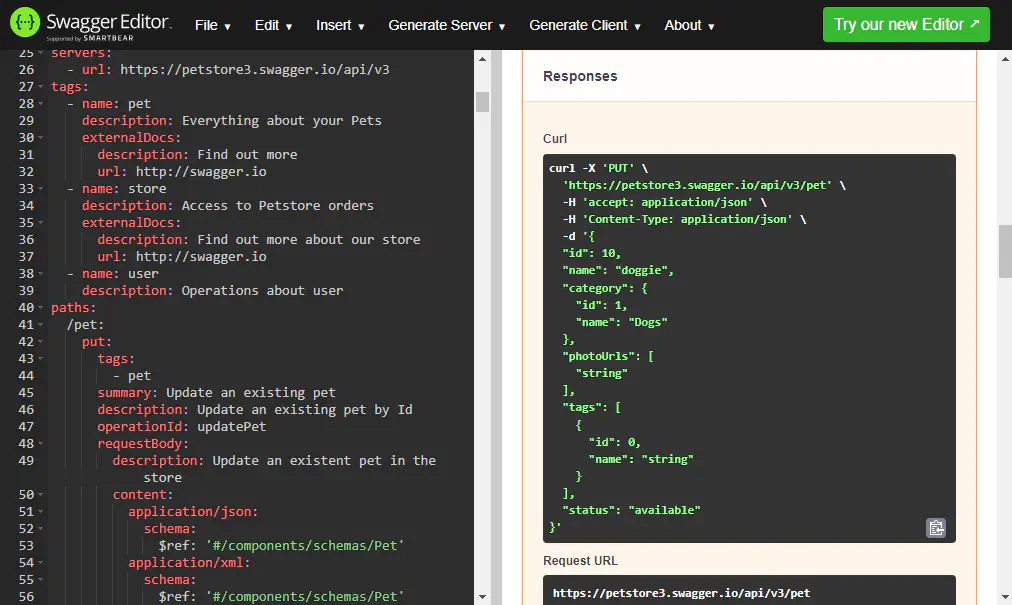
Exercise: Run your request on Swagger UI and see the response body
Sample of a Response Body
A request header provides additional details on the format and type of the data in the request body. The request header holds important metadata about the request body such as the format request should be sent and authorization header.
Types of Request Header
Here are some types of request headers:
Example of Request Header from our Sample Petstore API
 1    "headers": {
 2        "Accept": {
 3          "description": "Media type that is acceptable for the response",
 4          "schema": {
 5            "type": "string"
 6          },
 7          "example": "application/json"
 8        },
 9        "Content-Type": {
10          "description": "The MIME type of the body of the request",
11          "schema": {
12            "type": "string"
13          },
14          "example": "application/json"
15        }
16      }
17 }Headers in general provide additional information about a component. In this case, a response header provides additional details on the format and type of the response.
Types of Response Headers
Here are some types of response headers:
Example of Response Header from our Sample Petstore API
1    "Content-Type": {
2          "description": "The MIME type of the body of the request",
3          "schema": {
4            "type": "string"
5          },
6          "example": "application/json"
7        }
8      }
9 }When you send a request, the API returns a response. Now the response may not always be what you expected. Since an API always returns a response whether bad or good, Status codes are a necessity. Status codes are numbers that help you diagnose the situation of your responses.
Here is a well-explained list of status codes:
1xx: Informational
2xx: Success
3xx: Redirection
4xx: Client Errors
5xx: Server Errors