Formatting
- Headings
- Good and bad headings
- Lists
- Tables
- Figures and Images
- How to improve readability and clarity using formatting
Formatting refers to visually organizing a document. It covers font size, font selection, lists, indentation, margins, alignment, spacing, etc. Technical documents must be user-centered. The information should be explained and presented in a style that is readable and easy to understand.
Formatting is one of the core elements of all technical documents. A format should show the hierarchical structure of information that guides the reader through the text. Ensuring that the document is user-friendly and follows a clear organizational pattern is important in technical writing.
Imagine visiting your friend, only to find everything in the wrong place. It can be frustrating and confusing. Similarly, if your technical document is not properly formatted, it can be difficult for readers to understand. You should follow certain guidelines to write a well-formatted and user-centered technical document. Present the information in a style that is easy to read and understand. Formatting should show a hierarchical structure of information that guides the reader through the text.
Common Formatting Elements
The next section explores headings, key guidelines for headings, and levels Of heading .
Headings
Most technical articles and documents follow a particular hierarchy from introduction to conclusion. The structure often depends on the type of article or technical document. Headings and subheadings are important elements of technical writing. They make your content more organized and help readers navigate your document. Proper use of headings and subheadings increases the accessibility of your documents. Writing descriptive and concise headings highlighting each section's main idea is very important.
Headings alert your readers about upcoming topics, and help them jump to the point of interest. They help you organize your content into large (major headings) and smaller (subheadings) sections. Headings are formatted in levels: first level, second level, and third level. They vary in position and formatting.
Avoid using headings that do not convey specific information. Headings should clearly state what your readers should expect from that section. Additionally, keywords in your headings optimize your technical document for search engines.
Key Guidelines for Headings
-
Always make your headings descriptive. Using headings like ‘’Django plugins” does not help the reader.
-
Always make headings parallel in phrasing. This helps your readers know if the sections are similar to the preceding ones. It is best practice to use parallel construction to structure the phrases similarly. If one headline begins with a verb, all headlines should also begin with a verb.
Example “Conquer Your New Year's Resolutions with These Simple Tips”
-
Ensure that your headings maintain consistency. Use size, style, color, italics, alignment, bold, etc. These guidelines help you design headings effectively.
-
Format headings to indicate their level. Always use a hierarchical format when writing headings. First-level headings are larger and bolder than second and subsequent level headings.
-
Always use a consistent style of capitalization. Headings can be capitalized using several approaches. It is important maintain the same capitalization style across the document.
Levels Of Heading
First Level Heading
The first level heading is the highest or main heading. It is best practice for first-level headings to be the largest and bold.
Level Two Heading
The second level heading is a subheading of level 1. Second-level headings are usually smaller and different from first-level headings. When formatting, it’s best practice to indent the heading and align the subsequent blocks of text.
Level Three Heading
Level 3 is the subheading of Level 2. Third-level headings are usually smaller than level-two headings. It should either be italicized or indented.
Good and Bad Heading
Good headlines draw the attention of your audience. Headings are a quick way to capture users' attention and encourage them to read more. Examples of good and bad headings include the following:
Good Headings
- “Introduction to Data Analysis”
Indicates the main topic.
- “Key Benefits of Eating Balanced Diets”
Conveys the main points to be discussed
- “Methods for improving productivity as a student”
Describes the section's content and provides a clear focus
Bad Headings
- “Jewelry I found”
Vague and lacks specificity, leaving readers uncertain about the content.
- “Chapter 1”
Generic and Uninformative. Readers can't discern the content without more context
- “Random Stuffs”
Similar to “Random Facts”. It lacks specificity and doesn’t guide the reader
The next section explores list, guidelines for creating lists, and types of list.
List
It is important to convey information clearly and concisely. Using lists in your documentation can be helpful in highlighting important points, properly structuring your paragraphs and sentences, and organizing your document. Listing makes a technical document more readable and simplified. It is important to understand how to format a list properly.
Guidelines for Creating Lists
-
Do not split a list across two pages. Try as much as possible to ensure the list stays on one page.
-
Try not to overuse lists. Most importantly, a list should have an explanatory text to add more information about the list and its importance.
-
Ensure that the first letter of each of the list items is capitalized.
-
At least 2-8 items should be included in a list. Ensure that you have at least two items in a list, or it might not be considered a list. Also, having more than 8 items in a list is too much. If the information can be merged, it will make it readable and well formatted.
-
Add spacing to the list to enhance the readability of the technical document.
-
Always use parallel phrasing / parallel construction.
Parallel Phrasing/Parallel Construction
These are similar, but have slight differences.
Parallel Construction
This is the practice of using the same grammatical form for each item in a list.
Parallel Construction Example
Our software helps you to:
- Write technical documentation
- Review team contributions
- Publish content with one click
Each bullet starts with a verb in base form: write, review, publish.
Non-parallel Construction Example
Our software helps you to:
- Writing technical documentation
- Review team contributions
- content can be published
Notice how the grammar is inconsistent. THis breaks parallelism and confuses the reader.
Parallel Phrasing
This focuses on phrasing patterns in related sentences or clauses, not just grammar.
Parallel Phrasing Example
- Make sure the server is ruuning.
- Confirm that the database is connected.
- Check whether the API key is valid.
Each step uses a verb + object structure with a consistent rhythm.
Broken Parallel Phrasing
- Make sure the server is running.
- The database connection should be verified.
- Is the API key valid?
Here, the sentence structures are mixed (command, passive voice, question), which disrupts the flow.
List Types
Different kinds of lists serve different purposes.
In this section, we will look at five commonly used types of lists.
1. Bullet List
Bullet lists are the most commonly used type of list. They typically emphasize two or more items when a specific order is unimportant. Bullet lists can also add whitespace to a document to improve readability. However, they are generally short and should not be used for items longer than a few words.
Bullet list can be used to:
- List the ingredients for a recipe
- Outline the steps in a procedure
- Summarize the key points of a presentation,
- Create a checklist of tasks
2. Numbered List
Numbered lists should be used when the order of the listed items is important, and ideas must be expressed in chronological order. For example, numbered lists often provide instructions, outline steps in a process, or present a sequence of events. Use of numbered lists helps convey a sense of order and progression, making it easier for readers to follow the presented information.
Here is a simple, numbered list providing a clear and concise set of instructions on baking cookies:
Toggle to preview numbered list
- Gather the necessary ingredients.
- Preheat the oven to 375 degrees Fahrenheit.
- Combine the dry ingredients in a large bowl.
- In a separate bowl, cream the butter and sugar together. Beat in the eggs one at a time.
- Gradually add the dry ingredients to the wet ingredients, mixing until combined. Stir in the vanilla extract.
- Drop rounded tablespoons onto ungreased baking sheets.
- Bake for 10-12 minutes, or until golden brown.
- cool on baking sheets for a few minutes before transferring to a wire rack to cool completely.
Strive to keep your numbered lists within eight items, for optimal clarity.
Consider dividing your list into stages or phases if it exceeds eight items.
Subsequently, review your documents and check for formatting to enhance readability.
3. In-sentence lists
In-sentence lists are typically employed when you have only two to four items and desire to preserve sentence structure and paragraphing. For instance, you could use a sentence list to outline the ingredients for a simple recipe or the key points of a brief presentation.
Example of a sentence list
- The ingredients for this recipe are flour, sugar, eggs, and milk.
- The key points of my presentation are the importance of communication, teamwork, and adaptability.
Sentence lists allow you to maintain a cohesive flow while presenting a short list of items.
4. Labeled lists
Labeled lists are used when the listed items require further explanation or elaboration. For instance, you could use a labeled list to define key terms or outline the steps involved in a complex process.
Example of a labeled list
Components of a Computer
- Hardware: the physical components of a computer, such as the CPU, RAM, and hard drive.
- Software: The programs that enable a computer to function, such as the operating system and application software.
As seen, labeled lists provide a clear and structured way to present information that requires additional explanation.
Nested Lists
Nested lists are commonly used when list items have sub-lists, which are lists within a larger list. This structure can help organize and present complex information, particularly when hierarchical relationships between the items exist.
Example of a nested list
Toggle to preview nested list
How to Set Up Your Project
- Install the required tools:
- Node.js
- Git
- Code Editor (e.g., VS Code)
- Create your project folder:
- Open your terminal.
- Run the following commands:
- mkdir my-project
- cd my-project
Lists are crucial features of technical writing. They enhance readability, improve clarity, and ensure that ideas are conveyed accurately and effectively. It breaks down complex information into digestible chunks, making it easier for readers to grasp and retain key points. They also help to organize and structure content, creating a logical flow that guides the reader through the document.
The next section explores tables, steps to prepare tables in a technical document, and formatting guidelines for creating tables .
Tables
A table is a structured arrangement of rows and columns that presents information in a tabular format. It is often used to present selection, comparison, or study information. Well-designed tables in technical writing can make information clear and readable. It creates a visual representation of results, making them more concise and organized. Tables predominantly present numerical data, such as comparing characteristics like height and depth, or listing product prices.
Tables make it easy to compare information. It can show trends or patterns of increasing or decreasing activity.
How to Prepare Tables
-
Identify your audience
-
Write a clear outline
-
Create a template for your table
-
Design the Table Layout
-
Determine the Number of Columns Required
-
Select appropriate cell borders
-
Choose an appropriate font style that will be used across the documents
-
Add text elements
Formatting Guidelines for Creating Tables
-
Each column in a table should be properly labeled with a meaningful header.
-
A table cell should not hold more than two sentences
-
Introduce each table with a sentence that tells the readers what the list or table represents.
-
Always use parallelism within individual columns.
-
The data in the table should be properly explained so that readers don’t find it difficult to understand.
-
Tables should be simplified to the amount of data that illustrates your point.
-
A footnote proves useful for elaborating on specific aspects of one or more items in the table rather than cluttering the table with excessive information.
-
Always include enough data to illustrate your point without misrepresenting it.
An example of a table with appropriate introductory text and format
Table 1: The following table identifies States and Capitals in Nigeria, Their Slogans and Current Governor
| S/N | State | Capital | Slogan | Current Governor |
|---|---|---|---|---|
| 01 | Abia | Umuahia | God’s Own State | Alex Otti |
| 02 | Adamawa | Yola | Land of Beauty | Ahmadu Umaru Fintiri |
| 03 | Akwa - Ibom | Uyo | Land of Promise | Umo Eno |
In summary, tables should be introduced and referenced in the text beforehand. They should be numbered sequentially and have concise, descriptive, and easy-to-understand captions.
The next section explores figures, key guidelines for figures, and types of figures in technical writing .
Figures
A figure can be considered as any visual element or presentation incorporated into a technical document. Figures can encompass photographs, sketches, schematics, line graphs, and various other forms of visual representation.
In most instances, figures present data clearly and concisely. When the need arises to convey quantitative information in a visually appealing way, figures should be employed to enhance the reader's understanding and comprehension. Figures should be simple and clear. Avoid adding borders, grid lines, background patterns, and 3-D effects.
Key Guidelines for Figures
-
Figures should exhibit high-quality image resolution, ensuring clarity and visual appeal.
-
Each figure in a technical report should be assigned a unique identifier, enabling seamless referencing throughout the document.
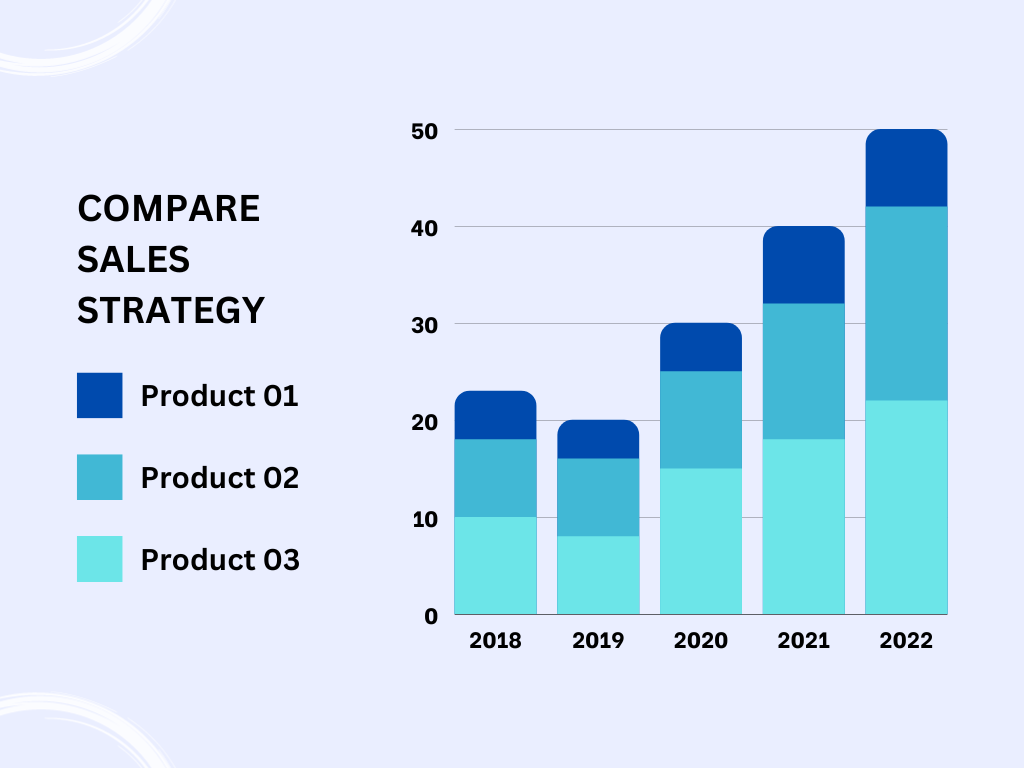 Fig 1: Sales Strategy
Notice that the image used above has a unique identifier for easy reference.
-
All figure elements, including labels, captions, and legends, should incorporate a combination of letters and numbers to ensure unambiguous identification and reference throughout your document.
-
Figures should be simplified and explanatory, enhancing the clarity and comprehension of the presented information.
-
Opt for clear, concise, and well-organized figures that effectively convey the intended information to the reader.
-
Utilize contemporary tools to produce engaging visuals that improve your writing. Take advantage of the features of Microsoft Office and other specialized software to design graphics that are visually attractive but also informative and efficient in communicating intricate technical ideas.
-
Add a clear, concise, and descriptive image description, and include all necessary information.
Take a close look at Fig 2 below. Do you understand what information it conveys?
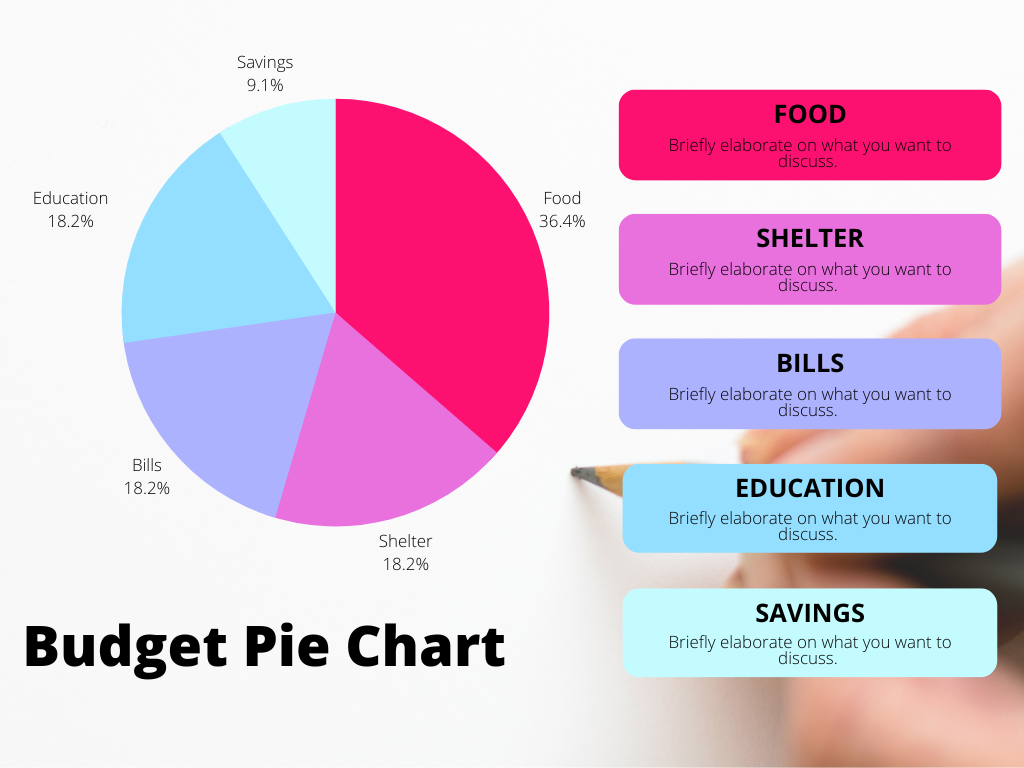 Fig 2: Budget pie chart
If you take a closer look at Fig 3, you can interpret the image. However, the lack of a descriptive caption makes it difficult to be certain.
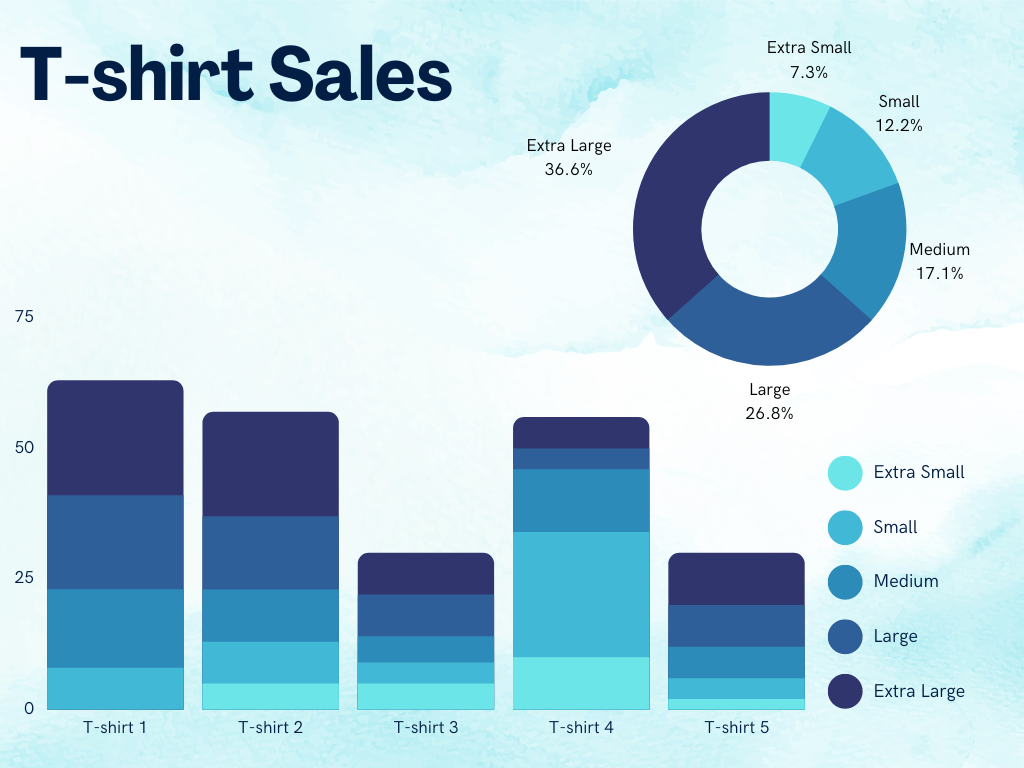 Fig 3: A Budget Bar Chart showing the percentage of T-shirt sales
Figure 3 has a numbered caption and a descriptive title. With this added information, the reader will have a clearer and more informative view of the figure.
Types of Figures
There are many types of figures in technical writing, including but not limited to:
-
Diagrams: They are often used to represent a model or an object. These images can be manually designed or drawn using computer software. Diagrams represent objects such as buildings, vehicles, and tools.
-
Flow Charts: They are visual representations used to document and design processes or programs. It is also a pictorial representation of a process in sequential order.
-
Pie Charts: They are graphics often used to communicate varying percentages or values to each other.
-
Histograms: They are graphical representation that organizes a group of data points into user-specified ranges.
The next section explores images, general guidelines to tonsider while adding images, and Pictures in Documentation.
Images
As a technical writer, you aim to craft clear, understandable, and readable documents. The goal is to provide your readers with the best possible assistance for using a product.
One excellent way to achieve this is by incorporating images into your writing. These images may include photos, screenshots, graphics, and illustrations. It improves content clarity, particularly when writing installation guides, instruction manuals, or introducing new products.
Incorporating screenshots of the process enhances clarity and comprehension when crafting technical documents, such as user manuals, how-to guides, or release notes. When guiding a user to use a new application, it is important to ensure the instructions are clear and easy to understand. One effective way to achieve this is using images to support the text.
Outlining the steps without an image might not be as descriptive and understandable as one with an image. Images can help users visualize what they are expected to do, making it easier to follow the instructions.
Example 1
To seamlessly use this app, follow these steps:
- Go the Home Screen: The initial screen presents various sections allowing you to select a class based on your preferred subject.

Fig 4: How to navigate the home screen
- Upgrade to VIP Membership: If you wish to unlock the app's additional benefits, click the Upgrade Now button to become a VIP member.

Fig 5: How to upgrade to VIP membership
- Access the Finance Class: If you're interested in finance, click the "Join Class" button to commence the course.

Fig 6: How to access the finance class
From example 1, you can see that the steps for seamlessly using the application were well-aligned and structured. However, one thing is missing. Guess what?
See the next example.
Example 2
To seamlessly use this app, follow these steps:
-
Go to the Home Screen: The initial screen presents various sections, allowing you to select a class based on your preferred subject.
-
Upgrade to VIP Membership: If you wish to unlock the app's additional benefits, click the "Upgrade Now" button to become a VIP member.
-
Access the Finance Class: If you're in finance, click the "Join Class" button to commence the course.
As seen, the example with visuals gave a better, more readable, and more understanding explanation than the one without visuals. So, there are several good reasons for adding visuals to technical documentation. Images make the content easier to understand, and they aid in the speed at which the information presented is processed. It also makes complex documentation clear and concise. How and where you will use images in your documentation depends on many elements.
Even though images are important, note that there may be restrictions on using images in certain technical documents, particularly if they contain sensitive or confidential information.
Creating professional-quality images for technical documentation often requires specialized tools and expertise that may only be available to some. Translating illustrations can be costly, so it is important to carefully consider the need for images before incorporating them into a technical document.
General Guidelines to Consider While Adding Images
The following guidelines are best practices for adding an image to your article.
-
The image included should be relevant to the steps you are trying to clarify.
-
Ensure you add a description and reference before placement.
-
Always use appropriate and descriptive captions and labels
-
Always credit image owners if you're using an image containing copyrighted information
-
Always add clear images, especially while adding screenshots, either in a technical manual or release note. Endeavor to use a screenshotting tool to get good screenshots.
Best Practices for Adding Images
1. Choose the right image format
When selecting an image format, consider the type of image you are working with and its intended use. Common image formats in technical documentation include JPEG, PNG, and GIF. JPEGs are best for photographs, while PNGs and GIFs are better suited for screenshots or diagrams.
2. Optimize image size and resolution
Keep image sizes as small as possible without compromising quality. Large images can slow down the loading time of online documentation, while overly compressed images can affect their clarity and readability. As a general rule of thumb, aim for a resolution of 72 dpi for web-based documentation and 300 dpi for print.
3. Use descriptive image titles and alt text
Provide descriptive titles for images that accurately reflect their contents. This can help users quickly identify the image's purpose and relevance. Additionally, provide alternative text (alt text) for each image to ensure accessibility for visually impaired users.
4. Place images near relevant text
Place them near the relevant text or instructions they illustrate to ensure that images are helpful and not confusing. This will help users understand the relationship between the image and the text and avoid confusion.
5. Label images clearly
Use labels or captions to provide additional context or information about an image. For example, if you use a screenshot to illustrate a process, label each step with a descriptive caption.
6. Use consistent formatting
To ensure consistency throughout your documentation, use the same formatting for all images. This includes size, resolution, and placement.
How to Use Formatting to Improve the Readability and Clarity
Readability is simply communicating ideas in a clear and accessible way.
-
Consistency is very important in technical writing. You should use uniform styles, sizes, and formats for all elements to make your document easy to read and understand. Creating a hierarchy with fonts, colors, and alignment is also crucial in technical writing. It helps readers quickly scan the document and find the necessary information.
-
Another important thing you should consider is your audience. Always tailor your content to your readers and understand who you're writing for. This will help you determine the appropriate language, tone, and level of technicality to use in your document.
-
Organizing your content in a hierarchical format is also essential. Creating an outline is a key tool for organization in technical writing. It helps you to organize your content and create an easier user experience for your readers.
-
Simplicity is key in technical writing. Always use clear and straightforward language and write short sentences. This will help you convey your information concisely and ensure your readers can easily understand your content.
Complete the following exercises before proceeding to the next module.
Write a blog post incorporating the different formatting techniques discussed in this module.
consider:
-
Sentence length and structure: Are the sentences concise and varied?
-
Paragraph structure: Are the paragraphs focused and well-organized?
-
Headings and subheadings: Are they used effectively to break up the text and guide the reader?
-
Bullet points and numbered lists: Are they used appropriately for clarity and conciseness?
-
Images and other visuals: Are they relevant and well-placed?
-
Call to action: Does the post end with a clear call to action for the reader?
After review, tag @TechnicalWriti6 on X(Twitter with the link to you published submission.)
The next module explores editing in technical writing.