How I Documented a Mock Delivery API Using an OpenAPI Spec Generator and Published on GitBook


Well-structured API documentation is as important as the API itself. In this article, I walk through my full documentation process for the Mock Delivery API:
- Understanding the API behavior
- Documenting endpoints manually
- Converting requests into an OpenAPI 3.1 specification using an API-to-OpenAPI-generator
- Publishing the documentation on GitBook for public consumption
This workflow mirrors what many real-world teams do when retrofitting documentation onto an existing API or mock service.
Project overview: mock delivery API
The Mock Delivery API is a simulated logistics and delivery service designed to represent common backend workflows in a delivery platform. It includes endpoints for:
- Authentication
- Drivers
- Parcels
- Deliveries
- Hubs
- Assignments
- Tracking
- Reports
Prerequisites
Before starting, here are some basic things to know:
- Basic understanding of RESTful APIsRESTful APIs
- Familiarity with HTTP methods (GET, POST, PUT, DELETE)
- Knowledge of request–response cycles and status codes
- Understanding of authentication concepts (tokens, headers, authorization flow)
- Ability to read and interpret JSON payloads
Understanding the API and authentication flow
Before writing any documentation, I reviewed the API behavior and request-response patterns, starting with authentication, since it governs access to protected endpoints.
The authentication flow follows a straightforward pattern:
- A user submits login credentials to the authentication endpoint
- The API returns an access token upon successful authentication
- The token is included in subsequent requests as an authorization header
Step 1 - Server setup
Clone the repository on your local machine. Then open your terminal in VS Code and run:
npm install
npm start
Once the server starts, you will see:
http://localhost:4000
This URL is the base URL
Step 2 - Authentication
There are 52 endpoints to document, as listed in the README on GitHub. Documentation starts with the Authentication section.
Request
POST http://localhost:4000/auth/login
The above shows the authentication endpoint used to get the bearer token.
Request body
{
  "username": "demo",
  "password": "demo"
}
Response
{
  "token": "testtoken123",
  "user": "mock-user"
}
This response returns the Bearer token used for authenticated requests.
The diagram below shows where to insert your endpoint, select your POST request, and insert the body while using your openapi-spec-generator. After filling in all the parameters, click send.
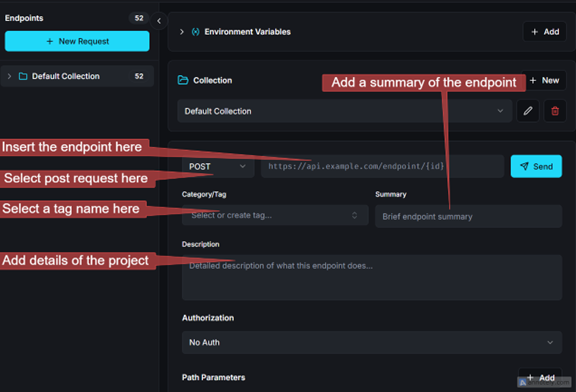
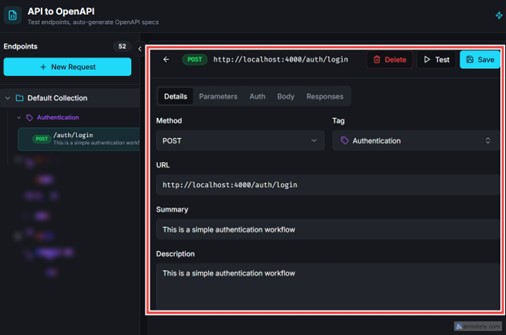
Output
The output below shows a fully documented API endpoint, including:
- Method
- URL
- Tag
- Summary
- Description
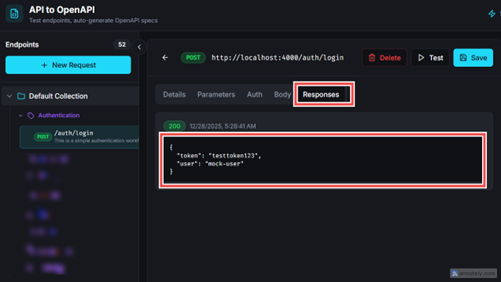
After clicking Send, the bearer token appears in the response tab.
Step 3 - Documenting other endpoints
This section demonstrates how to document additional endpoints using the Bearer token for authorization and how to use path parameters.
Documenting the deliveries endpoint
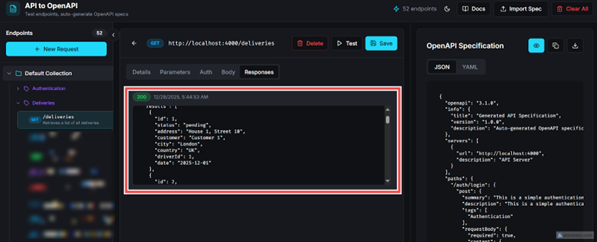
- GET /deliveries – list deliveries (supports status, city, country) This endpoint retrieves the entire list of deliveries
GET http://localhost:4000/deliveries
As shown in the image below, steps:
-
Select GET request
-
Enter the endpoint
-
Add a tag name
-
Write a brief summary/description
-
Add the Bearer Token in the Authorization section
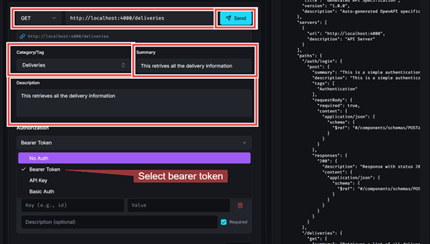
Output
This shows the output after clicking the send button; it provides a full list of all delivery records.
2. GET /deliveries/:id – Get single delivery
GET http://localhost:4000/deliveries/:id
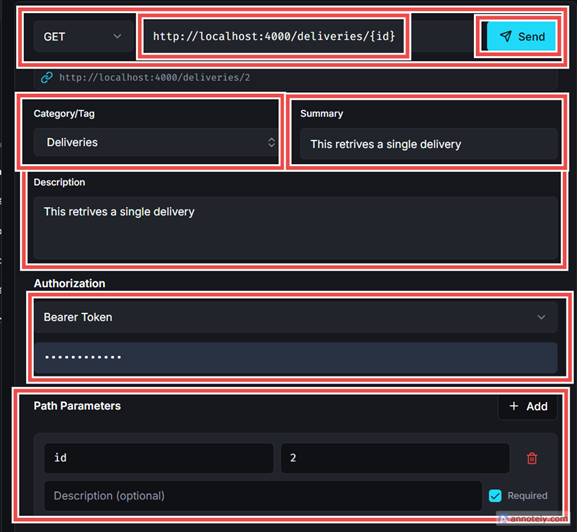
This step demonstrates the use of a path parameter to retrieve information for a single delivery.
Use curly braces around id, as shown in the following URL, because the path parameter resolves to the value of the specific ID saved, returning only its details.
http://localhost:4000/deliveries/{id}
Steps:
-
Select GET as the HTTP method, since this endpoint is used to retrieve data.
-
Enter the endpoint URL in the request field provided.
-
Next, assign a tag to categorize the endpoint (in this case, Deliveries), and add a concise summary/description that clearly explains the purpose of the endpoint.
-
Write a clear description
-
Under the Authorization section, select Bearer Token and enter provide a valid access token to authenticate the request
-
To retrieve the delivery record with an ID of 2, navigate to the Path Parameters section. Path parameters use a key-value pair structure: enter id as the key and 2 as the corresponding value, then click send. This value is then substituted into the endpoint path, allowing the request to fetch the specific delivery resource, as illustrated in the image below.:
- Key:
id - Value:
2
- Key:
-
Click Send to retrieve the specific record.
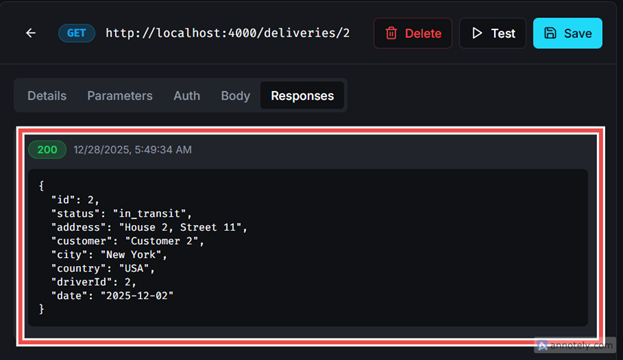
Output
The image below shows the response after the request was sent. It retrieves only the delivery record with an ID of 2.
After documenting all endpoints, download the OpenAPI specification file.
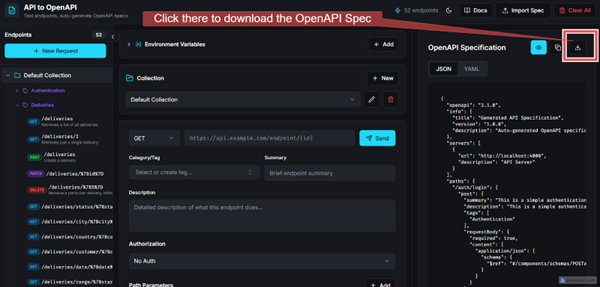
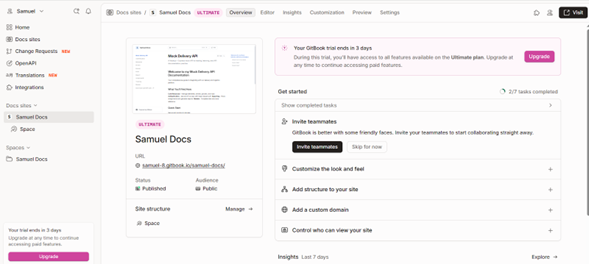
Step 4 - Publishing on GitBook
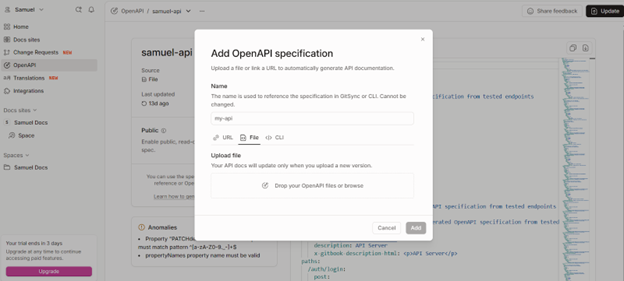
Go to GitBook and navigate to the OpenAPI tab on the left side section, as shown in the following image.
- Navigate to the OpenAPI tab
- Upload your OpenAPI specification file
- After adding your OpenAPI specification, click Publish
This allows you to:
- Manage and publish API documentation
- Track progress
- Customize your documentation site
- Collaborate with your team
Next steps
Explore the OpenAPI Spec Generator to better understand how it helps you create structured API specifications quickly.
Use the tool to:
- Generate specs
- Improve documentation workflows
- Access supporting resources